Batch Job Monitoring with Dynatrace
Legacy Product
This tutorial refers to the legacy application monitoring product from Dynatrace. Not the Dynatrace platform.
Dynatrace ships with many out of the box sensor packs but for anything non-standard, you’ll need a little bit more configuration to get up and running. This post will show you how to monitor any custom batch jobs within Dynatrace AppMon and retrieve the full Purepath data for the job.
This post will give a Java-based example, but the principles are identical for other technology types.
Prerequisites
Ensure you have a System profile and agent group created, ready for your agent to connect to.
Code
Here is my batch job. The script is packaged as an executable JAR file which runs in an endless loop. Every 2 seconds the startBatch method is called. The startBatch method calls the doThis method which simply prints a message to the console. The batch then sleeps until the next loop execution.
To test: Download the executable JAR file or view the source code on Github.
To execute: java -jar SimpleBatchJob.jar
package com.adamgardner.code;

public class EntryPoint {
  public static void main(String[] args) {
    while (true)
    {
      try
      {
        startBatch();
        Thread.sleep(2000);
      }
      catch (Exception e) {}
    }
  }

  private static void startBatch() {
    System.out.println("Starting Batch Job");
    doThis();
  }

  private static void doThis() {
    System.out.println("Now doing this…");
    System.out.println("——————");
  }
}
Instrument with AppMon
When you first created your tier, you AppMon will have given you a string that you need to include in the JVM startup parameters. It will begin with -agentpath:...
Mine is:
-agentpath:"C:/Program Files/Dynatrace/Dynatrace 7.0/agent/lib64/dtagent.dll"=name=BatchTier_Monitoring,collector=localhost:9998
So rather than executing my JAR as a standard JAR (java -jar SimpleBatchJob.jar), I’ll use:
java -jar -agentpath:"C:/Program Files/Dynatrace/Dynatrace 7.0/agent/lib64/dtagent.dll"=name=BatchTier_Monitoring,collector=localhost:9998 SimpleBatchJob.jar
Note that the name portion on the above will be unique to your setup.
In the agents overview dashlet, you should now see a happily connected agent (look for the green ring).

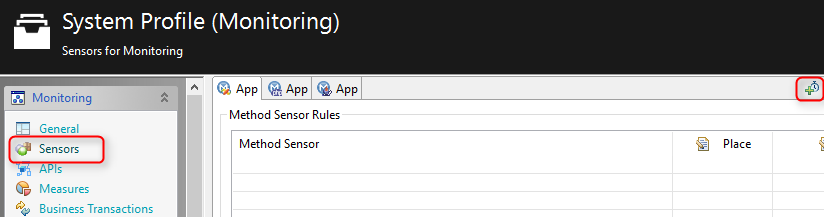
Adding Sensors & Creating Purepaths
At this point, you won’t have any purepaths. Remember, I told you that we’d need to create some custom sensor rules? Time to do that. This will tell Dynatrace where to begin the purepath.
We are therefore going to want to place the sensor on the startBatch method. In AppMon terms, this is called the Purepath Entry Point.
- Open the system profile > sensors > Add a sensor group
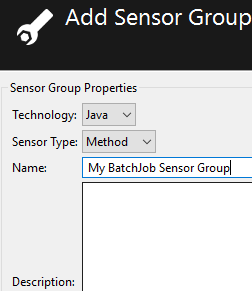
- Create a Java Method sensor group. Give it any name you desire.
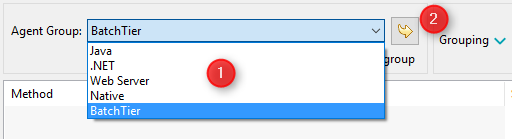
- Browse the class cache, highlight the BatchTier agent group and click the yellow arrow icon.

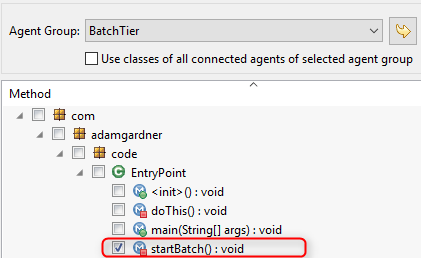
- Browse (or use
Ctrl+Fto search) until you find thestartBatchmethod. Place a sensor on it. You will be warned that changed sensor rules will only take effect after you application is restarted, that’s OK. We’ll restart the JAR soon so you can OK this dialog.
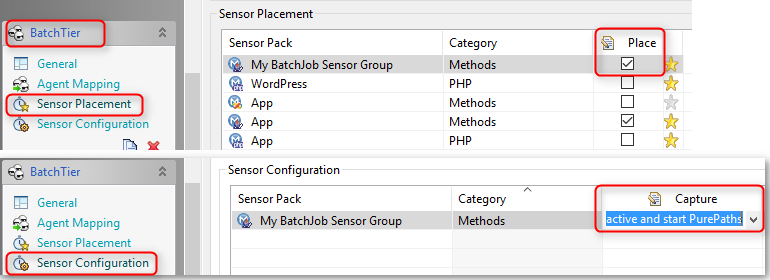
- The final step is to make sure you’ve placed the sensor group (mine was called My BatchJob Sensor Group) on the tier containing the agents (my tier was called BatchTier). Navigate to the Sensor Placement section of the relevant agent group and ensure it's placed and set to Active and Start Purepaths (sensor configuration settings).
Restart App & See Your Batch Job
Restart the JAR file then open the Purepaths dashlet to see your purepaths.
In future tutorials we’ll expand this batch job to cover more complex batch processing scenarios.