Dynatrace Apache SOLR Monitoring in Minutes
Legacy Product
This tutorial refers to the legacy application monitoring product from Dynatrace. Not the Dynatrace platform.
Having Apache Solr performance issues or just want to make sure it keeps running like a dream? Let’s get your Solr instances monitored in minutes with Dynatrace Application Monitoring.
I promise, this will take less than 15 minutes.
Prerequisites
- A licensed Dynatrace AppMon server & collector.
- Apache Solr installed.
Let's Go
- Download the Apache Solr Fastpack from the Dynatrace Community.
- Upload the
.dtpfastpack file, via the client, to the Dynatrace server.
Install Web Server Agent
The following instructions simply specify how to install the standard Dynatrace web server agent. Skip if you’ve already got the agent installed on the Solr box.
- Download the Dynatrace agent JAR file to the /tmp directory of your Solr server.
cd /tmp
wget https://files.dynatrace.com/downloads/OnPrem/dynaTrace/6.5/6.5.0.1289/dynatrace-wsagent-6.5.0.1289-linux-x86-64.tar
- Extract the agent, copy the
.shfile to/optand execute.
sudo tar -xvf dynatrace-wsagent-6.5.0.1289-linux-x86-64.tar
sudo cp dynatrace-wsagent-6.5.0.1289-linux-x64.sh /opt
cd /opt
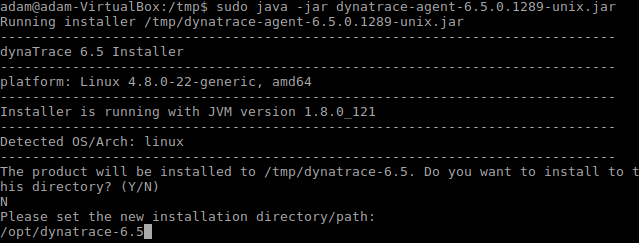
sudo ./dynatrace-wsagent-6.5.0.1289-linux-x64.sh
- Add the Dynatrace master agent to the init.d startup scripts & add to automatic startup.
sudo cp /opt/dynatrace-6.5/init.d/dynaTraceWebServerAgent /etc/init.d
cd /etc/init.d
sudo update-rc.d dynaTraceWebServerAgent defaults
- Edit the master web server agent config to have the correct name (starts with
SOLR) and ensure it points to your collector. Then start thedynaTraceWebServerAgentservice.
sudo nano /opt/dynatrace-6.5/agent/conf/dtwsagent.ini
// CHANGE NAME PARAMETER TO BE SOLR_AGENT
// CHANGE SERVER PARAMETER TO POINT TO THE COLLECTOR IP ADDRESS
service dynaTraceWebServerAgent start
If it worked, great! We’re halfway there! You should see this in the Agent Overview dashlet.

Instrument SOLR
Good news – this bit is really easy!
Open the /opt/solr-6.5.0/bin/solr.in.sh file (or solr.in.cmd on Windows) and add the following line (be sure to substitute your collector IP rather than my 192.168.1.1 address!)

sudo nano /opt/solr-6.5.0/bin/solr.in.sh
// ADD FOLLOWING LINE ABOVE THE OTHER SOLR_OPTS LINES
SOLR_OPTS=”$SOLR_OPTS -agentpath:/opt/dynatrace-6.5/agent/lib64/libdtagent.so=name=Solr_Agent,collector=192.167.1.1:9998″
Start SOLR
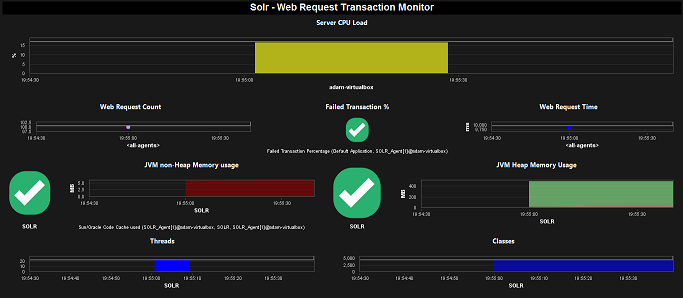
Run /opt/solr-6.5.0/bin/solr start - You should see both agents in the Agents Overview, the preconfigured dashboards will work and you’ll have Purepaths flowing into the system.