Saltstack 101 - Setup and Configuration Guide
Salt / SaltStack is an open-source piece of software for remote administration, configuration automation and event-driven orchestration. This tutorial will show you how to get it up and running...
Prerequisites
- A DigitalOcean account (free trial using this link).
Saltstack Architecture
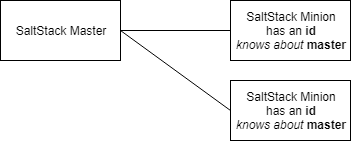
SaltStack has a very simple architecture. One or more master nodes issue commands to one or more minion nodes. Each minion has an id (a name) and the minion is configured to point to its master. By default, the id is the hostname of the machine, but this can be overridden.
Note: Multiple masters and masterless configurations are supported, but this guide will not discuss these further.

Communication Paths
Minions are configured to know about their master. Minions then reach back to their master. An administrator chooses to accept or deny that minion.
Once “accepted”, commands are issued from the master out to the minion(s).
Setup
General Setup
Note: There is a bootstrap option available here but in the interests of transparency, I’ll be installing it the "full" way.
- Create two Ubuntu 16.04 DigitalOcean droplets (other cloud hosts or VMs will also work). The smallest $5 droplet is sufficient for this tutorial.
- Give each machine a different hostname. I’ll call mine
saltstack-masterandsaltstack-minion

Master Setup
SSH into saltstack-master and run the following commands. The first three lines just get things setup and add the saltstack repository to your system.
The fourth line updates your packages and pulls down the latest package list.
The fifth line does the magic, installing the salt-master with the -y parameter to skip all manual inputs and assume yes to all questions.
wget -O - https://repo.saltstack.com/apt/ubuntu/16.04/amd64/latest/SALTSTACK-GPG-KEY.pub | apt-key add -
touch /etc/apt/sources.list.d/saltstack.list
echo 'deb http://repo.saltstack.com/apt/ubuntu/16.04/amd64/latest xenial main'| tee -a /etc/apt/sources.list.d/saltstack.list
apt-get update
apt-get install salt-master -y
Minion Setup
SSH into saltstack-minion and run the following commands. Notice they’re very similar to the master.
The only difference is that we install salt-minion and not salt-master.
wget -O - https://repo.saltstack.com/apt/ubuntu/16.04/amd64/latest/SALTSTACK-GPG-KEY.pub | apt-key add -
touch /etc/apt/sources.list.d/saltstack.list
echo 'deb http://repo.saltstack.com/apt/ubuntu/16.04/amd64/latest xenial main'| tee -a /etc/apt/sources.list.d/saltstack.list
apt-get update
apt-get install salt-minion -y
Point Minion at Master
Remember at the beginning of the article I said that the minion knows about the master? How? We need to specify the master’s IP address on the minion.
On the minion:
nano /etc/salt/minion
Look for the line which reads #master:salt. Below this line, add a new line. Replace 10.0.0.0 with the IP address of your master. Save and exit the file.
Now run your salt minion simply by typing salt-minion on the minion.
Accept Minion on Master
Flip back to the master node and run salt-key -L. This will list the status of all keys on the master.
You should see something like this:
root@saltstack-master:~# salt-key -L
Accepted Keys:
Denied Keys:
Unaccepted Keys:
  saltstack-minion
Rejected Keys:
This proves the minion has been able to attempt a connection to the master. Tell the master to accept connections from the minion:
salt-key -a saltstack-minion -y
Note: You can also accept all minions with salt-key -A -y
You're Installed. Test It Out.
Now let’s verify that the master can find the minion. We’ll use a basic ping from the test module.
From master: salt 'saltstack-minion' test.ping and you’ll see:
root@saltstack-master:~# salt 'saltstack-minion' test.ping
saltstack-minion:
  True
Bonus: Create & Write a File
If you’ve got this far, then you have a working SaltStack and the world is your proverbial Oyster. One more demo while you’re here. Let’s create and write a line of text from the master to the minion:
salt 'saltstack-minion' file.touch "/tmp/myText.txt"
salt 'saltstack-minion' file.append /tmp/myText.txt "This is my content..."