Automatic Management Zones - Autonomous Monitoring
Part 6 of my autonomous cloud tutorial series. This post will use the Dynatrace API to automatically create and update management zones.
This tutorial series builds from previous tutorials. I recommend you complete parts 1 through 4 first:
- Part one (Host Group Naming)
- Part two (Host Metadata)
- Part three (Service & Process Group Naming)
- Part four (Automatic Tag Rules)
- Part five (Automatic Application Definitions)
Recap
If you’ve followed previous tutorials, you now have 2 EC2 instances. Each running an Apache (httpd) webserver. One webserver serves the staging site, the other serves the production site.
We’ve associated metadata with the Dynatrace entities such as an Owner, Location and ChargeCode. We’ve also created rules within Dynatrace which transforms this metadata into Key / Value tags. Finally, we’ve defined two web applications (staging & production). This tells Dynatrace how to categorise the traffic coming from both webservers. All staging traffic into one application and all production traffic into the other application.
Management Zones
Management zones are an incredibly useful and flexible concept within Dynatrace. They provide flexibility by allowing you to segment a large environment into any sub divisions, based on tag values.
For example, you probably want a management zone per environment (show me only staging vs. production). You may also want to segment by Owner (when Alice logs in, she should only see her environment).
You can also segment at different layers of the smartscape model, so a business owner might only wish to see their applications and services for production. Another group of users may only need to see the infrastructure layer metrics of staging.
User permissions, alerting notifications and dashboards all respect the boundaries defined by management zones – so they’re also useful as filters.
Create a single "global" dashboard and then use the management zone filter to show only what you care about, all in real time. Onboard a new environment? Just create a new management zone and all your old dashboards still work!
Let's Do It
Dynatrace offers an API to manage management zones. Therefore, we will hold our management zones as JSON in a new file called managementZones.json
managementZones.json
{% raw %}
[{
"id": "1",
  "name": "Staging",
  "rules": [{
      "type": "SERVICE",
      "enabled": true,
      "propagationTypes": [
        "SERVICE_TO_PROCESS_GROUP_LIKE",
        "SERVICE_TO_HOST_LIKE"
      ],
      "conditions": [{
          "key": {
            "attribute": "HOST_TAGS"
          },
          "comparisonInfo": {
            "type": "TAG",
            "operator": "EQUALS",
            "value": {
              "context": "CONTEXTLESS",
              "key": "Environment",
              "value": "staging"
            },
            "negate": false
          }
        }]
    },
    {
      "type": "WEB_APPLICATION",
      "enabled": true,
      "propagationTypes": [],
      "conditions": [{
          "key": {
            "attribute": "WEB_APPLICATION_TAGS"
          },
          "comparisonInfo": {
            "type": "TAG",
            "operator": "TAG_KEY_EQUALS",
            "value": {
              "context": "CONTEXTLESS",
              "key": "mysite-staging"
            },
            "negate": false
          }
        }]
    }]
}, {
"id": "2",
  "name": "Production",
  "rules": [{
      "type": "SERVICE",
      "enabled": true,
      "propagationTypes": [
        "SERVICE_TO_PROCESS_GROUP_LIKE",
        "SERVICE_TO_HOST_LIKE"
      ],
      "conditions": [{
          "key": {
            "attribute": "HOST_TAGS"
          },
          "comparisonInfo": {
            "type": "TAG",
            "operator": "EQUALS",
            "value": {
              "context": "CONTEXTLESS",
              "key": "Environment",
              "value": "production"
            },
            "negate": false
          }
        }]
    },
    {
      "type": "WEB_APPLICATION",
      "enabled": true,
      "propagationTypes": [],
      "conditions": [{
          "key": {
            "attribute": "WEB_APPLICATION_TAGS"
          },
          "comparisonInfo": {
            "type": "TAG",
            "operator": "TAG_KEY_EQUALS",
            "value": {
              "context": "CONTEXTLESS",
              "key": "mysite-production"
            },
            "negate": false
          }
        }]
    }]
}, {
  "id": "3",
  "name": "Owner: Alice",
  "rules": [
    {
      "type": "SERVICE",
      "enabled": true,
      "propagationTypes": [
        "SERVICE_TO_PROCESS_GROUP_LIKE",
        "SERVICE_TO_HOST_LIKE"
      ],
      "conditions": [
        {
          "key": {
            "attribute": "SERVICE_TAGS"
          },
          "comparisonInfo": {
            "type": "TAG",
            "operator": "EQUALS",
            "value": {
              "context": "CONTEXTLESS",
              "key": "Owner",
              "value": "Alice"
            },
            "negate": false
          }
        }]
    }, {
      "type": "WEB_APPLICATION",
      "enabled": true,
      "propagationTypes": [],
      "conditions": [
        {
          "key": {
            "attribute": "WEB_APPLICATION_TAGS"
          },
          "comparisonInfo": {
            "type": "TAG",
            "operator": "TAG_KEY_EQUALS",
            "value": {
              "context": "CONTEXTLESS",
              "key": "mysite-staging"
            },
            "negate": false
          }
        }]
    }]
}]
JSON Explanation
The file above contains 3 management zones. First is called Staging. Second is called Production. Third is called Owner: Alice. All 3 are enabled ("enabled": true).
Staging Management Zone
This management zone looks at the tags on the service level of the Smartscape topology ("rules": [{ "type": "SERVICE"...). Whatever matches at this level, we’ve also told Dynatrace to include everything below this, at the process group and host level ("propagationTypes": [ "SERVICE_TO_PROCESS_GROUP_LIKE", "SERVICE_TO_HOST_LIKE"]).
We’re looking at any entities that have a tag with the Key: Value pair of (Environment: Staging). Notice that this tag is "contextless". If we were matching against tags imported from a third party, this field might read AWS instead.
We add a second rule to match against any web applications ("type": "WEB_APPLICATION") that are tagged with the mysite-staging tag. Recall that we defined all of these tags in a previous tutorial.
Production Management Zone
The production management zone is an almost identical definition to staging, except that the Value of the KV pair is set to production rather than staging. Similarly, the application tag is mysite-production rather than mysite-staging.
Owner: Alice Management Zone
This management zone uses the same structure as the staging and production management zones, but the values are different. This time, the tag Key / Value pair is set to Owner and Alice respectively.
In addition, because we know our system, we also know that Alice is responsible for the staging environment, so we include any web applications with the tag mysite-staging into Alice’s view of the world.
The Playbook
You’ll need to create an API token with write configuration access. Then replace the tenant_url with your own.
Save the following playbook (substituting in your values) as createManagementZone.yaml.
{% raw %}
---
- name: Create Management Zones
  hosts: 127.0.0.1
  gather_facts: no

  vars:
    tenant_url: ***.live.dynatrace.com
    dynatrace_api_write_token: ***
    management_zones: "{{ lookup('file', 'managementZones.json') }}"

  tasks:

  - name: Create or Update Management Zones
    uri:
      method: PUT
      status_code: 201, 204
      url: "https://{{ tenant_url }}/api/config/v1/managementZones/{{ item.id }}"
      headers:
        Authorization: Api-Token {{ dynatrace_api_write_token }}
      body_format: json
      body: "{{ item }}"
    loop: "{{ management_zones }}"
Playbook Explanation
This playbook is really simple & the logic can easily be ported to any other non-Ansible system.
We tell ansible to run the playbook locally (from the control machine) – because we’re only doing API calls. We define some variables up front and use these variables any time you see the double curly braces (eg. {{ my_variable }}).
The playbook consists of a single task which loops through each management zone. item is a special ansible keyword meaning the "thing" we’re looping through (ie. each management zone).
For each iteration of the loop, we’ll do a PUT operation to Dynatrace and pass it the JSON exactly as it’s defined in managementZones.json. Dynatrace will return either a 201 or 204 status code for a successful PUT request, so we tell Ansible that those codes mean a success.
Results
If you’ve followed this blog post correctly, you should have two files in your directory. The JSON file called managementZones.json and the playbook (above) saved as createManagementZone.yaml.
Now run the playbook: ansible-playbook createManagementZone.yaml
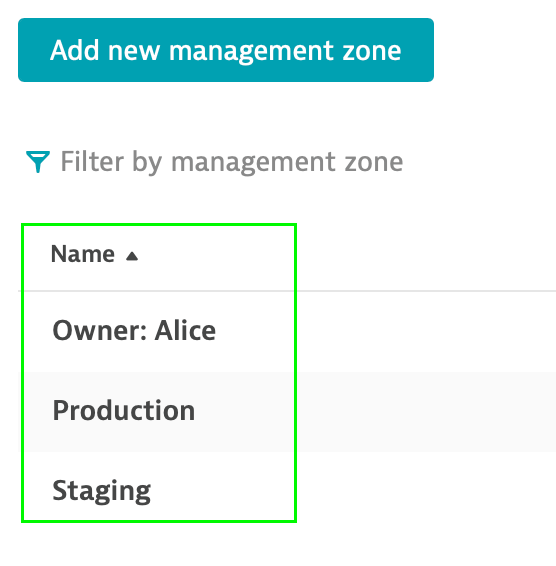
Notice that you now have 3 management zones available in your enviroment:
Also notice that by default, dashboards show all management zones:

You can filter dashboards (and other views) via the filter icon on the top bar to show only a subset. I can see all management zones because I’m an admin in my environment. Users will only be able to see management zones that they have permission to see:
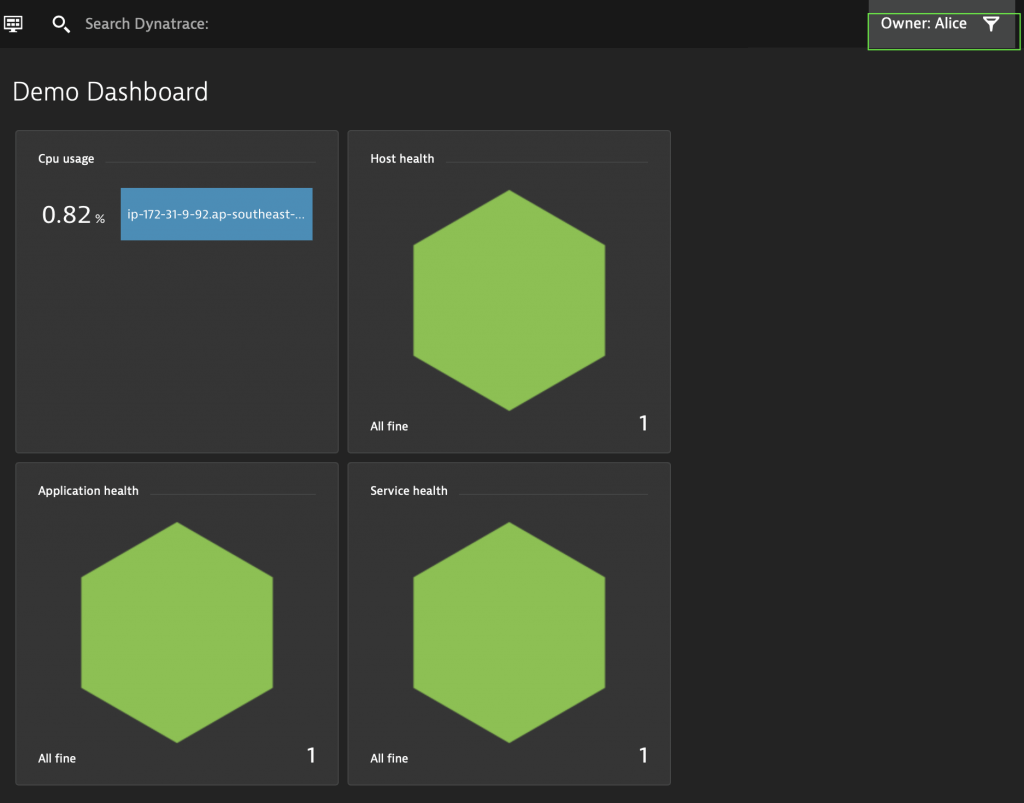
In the image above, Alice only sees one host CPU figure, one host status, one application and one service – because she only has access to the staging environment – not production.
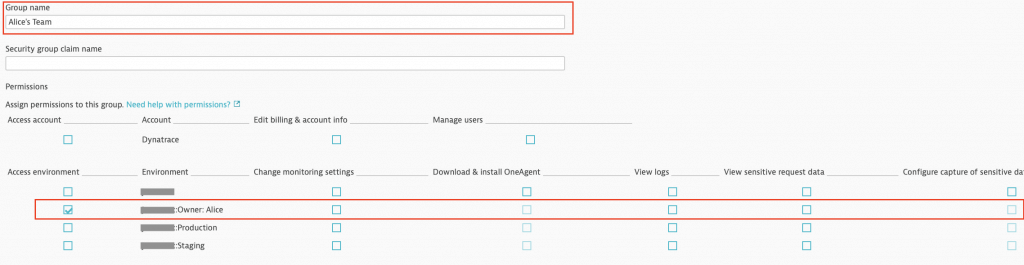
Here’s an example of a permission that only allows Alice's Team read-only access to the Owner: Alice management zone: